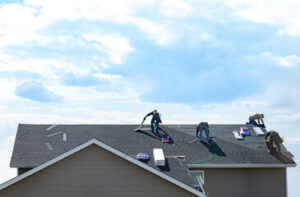
Regarding your home’s exterior, contractors may speak another language. Brushing up on some basic terms can help you understand what the 5R Roofing is saying and get the job done right.
Knowing the difference between rake and fascia will make communicating with your roofing contractor easier. Learn about the other trim pieces that work together to create the beautiful home you envision!
Eaves are the edges of a roof that overhang beyond exterior walls, and soffits are the underside of those eaves. They protect a structure’s roof from water damage, deter pests, and provide ventilation. Depending on the needs of the building, soffits may also add a decorative element to a home’s exterior. Understanding the differences between eaves and soffits is important when tackling roofing or remodeling projects.
The main function of an eave is to prevent water damage, especially from rain, snow, and hail. It directs precipitation away from the house’s walls and into gutter systems. Eaves also help control the internal temperature of a building by shading windows from the sun, keeping them cool in summer, and decreasing heat gain in winter.
A soffit is an eave’s underside, covering exposed rafters and cavities. It can be vented or closed, and it comes in various materials. Wood, vinyl, aluminum, and fiber cement are all popular choices. In addition to being durable, soffits are easy to maintain, requiring little more than a regular cleaning of debris from under the eaves.
A soffit is often clad in the same material as a fascia board to create a cohesive appearance, and it can be either insulated or uninsulated. Insulated soffits are usually more energy efficient, as they keep the attic space cooler and help with air-flow management. A soffit can also hide utility wiring, ductwork, and a chimney. It can also be used to conceal structural beams or freeze boards. The latter are small pieces of trim that attach to the soffit and rafters, and they can be designed with a wide range of aesthetic options.
A roof fascia is a long piece of trim installed where the roof meets a home’s walls. It is typically made of wood or uPVC and helps protect homes from rain damage and other elements. In addition, it provides a finished look to the area around the roof.
Unlike the soffit, a fascia board runs parallel to the wall rather than at an angle and is fixed to the ends of the roof rafters or trusses in the eaves. It also covers rafter tails to protect them from moisture and rotting. Fascia boards are available in a wide range of materials, including perforated vinyl and aluminum, which are inexpensive and easy to install. Vented fiber cement and wood are more durable options that offer a more premium aesthetic.
The rake is an angled portion of the roof with a low slope from the ridge to the eaves. It protects the roof’s edges and directs rainfall to gutters or downspouts. In many cases, a rake is covered by a fascia board and nailed to the joists’ top edge. The posts are then covered with shingles, which complete the roofing system.
Like the soffit, a rake is one of the most important parts of a roof. Without it, a home would be prone to leaks and other moisture problems. In addition, a sloping roof would be difficult to walk on and could become unsafe. A soffit and fascia protect the structure from animals, insects, and other intruders, which might otherwise cause damage or enter the home. Fortunately, qualified VA installers can install several types of durable and attractive materials for both a soffit and fascia.
Drip edges are an important roofing detail that protects your soffit and fascia boards. These metal pieces redirect water away from vulnerable parts of your roof and house and funnel it into gutters, where it can be safely drained to the ground or evaporate into the sky. Without a drip edge, water can collect along the edge of your roof, causing wood rot and other moisture damage. Drip edges are also a good way to prevent pests from entering your home through the “carpenter’s gap,” the space between a roof deck and the fascia board.
There are a few different types of drip edges, each with its own specific advantages and disadvantages. A classic style is a “Type C” drip edge, which is L-shaped and designed to lie under the roof decking. This is the most basic version of drip edge, but it still offers effective water runoff. Other drip edges are more complex and designed for certain kinds of roofs. A hemmed drip edge, for example, is intended to deter water from moving upward using capillary action and is primarily used with metal or standing seam roofing.
The best kind of drip edge for your roof will depend on the style and material you choose, as well as your budget and roofing project specifications. You’ll also want to consider whether you’re looking for a color or finish that matches your roof or the overall style of your home’s exterior. Having a cohesive cover will boost your home’s curb appeal and make it easier to maintain and repair. You’ll want to keep it clean and free of debris, sweep regularly, and paint or stain as needed to protect against sun damage.
Columns are one of the most distinctive architectural features in your home. They are often structural but can also be decorative. Columns are usually round in shape and have a capital that sits atop a base or pedestal. They are commonly seen as part of the entablature of classical architecture. Columns can be built in a wide variety of shapes, sizes, and materials depending on the desired aesthetics and needs of the project.
A column is a compression member that transfers the weight of the structure above it through the material into other structural elements below. They are commonly used to support beams, arches, and roofs but can also be decorative. Columns are designed to resist lateral forces and can be designed for seismic or wind loads.
Many design details can be incorporated into columns to give a room a unique look and feel. For example, the shaft of a column can have fluting and fillets. The width of the flute changes as it goes up the post on tapered columns and stays the same on non-tapered ones. There are also many different shapes that a column can be designed with,
HB&G offers various manufactured and wood porch columns in multiple sizes, styles, and materials for exterior use. Synthetic columns, made from cellular PVC, are a durable option as they can resist moisture, pests, and rot. They come in a wide range of predesigned styles and can be easily installed on existing structural columns. They are available in square or Craftsman style in plain, fluted, or recessed panels.
Corner posts are an important part of the fencing system, providing additional strength and stability. They can also be a design element, adding to the overall look of a home or building. Corner post trim offers styles that complement traditional, classic, or contemporary looks. For example, hand-carved details in ornate patterns create gorgeous dimensions.
Depending on soil type, fence height, and livestock type, the fence system may need to be braced using H-braces. These are usually installed between the ground and the first upright on the fence line or at the base of the corner posts. Coastal carries a complete line of fence supplies to accommodate these variable requirements.
The blanking panel on a corner unit must be moved backward to install these. This is done by undoing the four screws holding it and sliding it back. It should then be screwed back into place once the corner posts have been positioned. This will leave a service void that must be filled with the appropriate insulation.
To prepare the site for installation, clear the area and level it as required. Dig your holes for the posts, and check the post height is correct against a batter board, as well as the distance from the corner of the building to the next upright along the fence line. To do this, mark the good with a pencil to the face of the corner post and use a level to establish the distance from the corner of the building to that post. Use this information to mark the location of your H-braces and ensure they are installed properly.