Driveway Replacement – Common Signs That Your Driveway Needs Repair

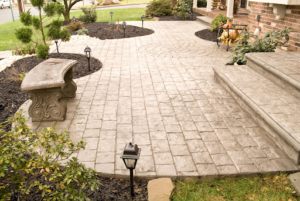
Driveway Replacement Colorado Springs provides a smooth vehicle surface and is a significant part of your home’s curb appeal. It also serves as a barrier between your property and the elements.

While minor cracks can be patched, larger and deeper ones are a time for a new driveway. If water seeps in, it can freeze and expand when the temperature changes, causing additional damage.

driveway replacement

Small cracks in the surface of a driveway are common, but they don’t necessarily indicate a major problem. In fact, they usually show up soon after the concrete is poured and are called shrinkage cracks. If they don’t get any bigger, you can simply seal them with a flexible concrete crack.

Wide fissures aren’t as easy to fix, but you can make a temporary repair by placing a concrete crack filler in the cracks. Before you can repair the cracks, though, it’s important to clean them thoroughly. Hose the area down and use a pressure washer with a low setting and wide nozzle to remove any dirt, debris or mold. You can also use a multipurpose pressure washer detergent to give the driveway a thorough cleaning without damaging the concrete. Once the cracks are cleaned, they need to be completely dry before you can fill them.

If the cracks are narrower than a quarter inch, you can use a liquid crack filler that is available at any home improvement store. It pores directly into the crack and self-levels. For wider cracks, you’ll need a bag of concrete crack repair mix or concrete resurfacer. For larger cracks, a roll of backer rod can help to prevent them from widening further. Backer rod is made from foam similar to a pool noodle and is available at most home improvement stores.

Once the cracks have been filled, you’ll need to sand any rough edges. You can use a hand sander or an orbital sander with coarse-grit sandpaper to smooth the repaired areas. It’s a good idea to follow the instructions on the specific product you’ve used so you can understand how long you should wait before driving over the newly-repaired cracks.

If the cracks are too severe, you may need to hire a professional. A qualified concrete contractor will be able to assess the damage and recommend the best method of repair. In some cases, you might need to remove and repourn the entire driveway. However, the cost of repairing a 10-foot section of the driveway is typically less than $50.

Potholes are one of the most common signs that a driveway is in need of repairs. They are a nuisance and can damage cars and cause tyre problems. They also pose a safety risk for pedestrians and drivers. Whether your driveway is asphalt or gravel, it’s important to address them as soon as you spot them.

Pothole repairs are not always easy, but they’re necessary. They are caused by water that seeps beneath the surface of your driveway, freezes and thaws, which causes the paving to rise upwards and create a hole. The problem becomes worse when traffic drives over the pothole, which further erodes the asphalt and creates a bigger hole.

A well-maintained driveway is less likely to have potholes, but it’s still possible to develop them over time. You can prevent them by making sure your driveway is free from debris and that water drains away easily. You should also avoid putting down oil-based products in your driveway, as these can lead to a chemical reaction with the asphalt and cause further damage.

The best way to prevent potholes is to invest in regular maintenance. This includes slurry sealing and regular chipping of your driveway. This will help to protect it from damage and keep it looking great for longer.

If you do have a pothole, the first step is to clean it out thoroughly. This can be done by using a scraper, chisel or strong screwdriver to remove all the deteriorated asphalt. Then you should fill the hole with coarse gravel up to about three inches below the asphalt level and then tamp down the surface. This can be done with a commercial tamper or by using a homemade substitute such as a piece of plywood nailed to the bottom of a four-foot long 2×4.

If you are repairing small potholes, look for a product that is HAPAS approved (Highways Authority Product Approval Scheme). These products will have been tested to ensure that they have a good bond with existing asphalt and will last for years. If you have a larger sinkhole, it might be necessary to dig it out and then add a fresh layer of asphalt to repair it properly.

Rainfall is beautiful, soothing, and cleansing—but it can also be a headache for homeowners with driveways that don’t drain well. Water with nowhere to go wears down driveway materials like tarmac and concrete, creates unsightly water stains, and can even damage your foundation. Thankfully, there are several effective solutions for drainage problems in your driveway.

The first step in solving your drainage issues is to examine the draining channels around your driveway. Make sure they are clear of debris and that they have proper slope. It’s also a good idea to check the gutters on your roof, as these will help direct runoff away from your driveway.

If you see that your driveway has low spots, this indicates a problem with the soil underneath. A more long-term solution would be to regrade your yard and driveway so that the area surrounding them is higher than the concrete.

Installing a driveway drain is another way to address drainage issues. These devices, which are also available in a variety of styles and designs, are designed to divert water away from your driveway and into the surrounding landscape. This not only helps reduce puddles and water stains, but it can help prevent erosion and other yard problems as well.

Another option for tackling a driveway with poor drainage is to add a layer of crushed rock or gravel. This will help increase the surface friction and absorb moisture, preventing it from pooling and damaging your driveway.

For a more permanent solution, you can install a trench drain. This is a long channel that runs across the length of your driveway. It’s covered with a grate, which keeps debris out of the drain while still allowing water to flow through it. These are a great option for any type of driveway, and they’re easy to install yourself or hire someone to do it for you.

A rough surface is a surface that has irregularities in shape and height. The unevenness can cause the friction between two surfaces to be much higher than normal. Rough surfaces also have a tendency to attract dust and dirt, which can cause the surfaces to become worn down and damaged over time. The good news is that most types of rough surfaces can be repaired with relatively inexpensive methods.

A smooth surface is a surface that has no irregularities or bumps on it. A smooth surface is very easy to clean and maintain, so it will look great for a long period of time. A smooth surface is often made of a material such as wood, tile, or concrete.

Rough surfaces are a common problem in driveways, and there are many ways that they can be repaired. Most of the time, it is a simple matter of filling in the cracks and holes with concrete or cold patch asphalt. In some cases, however, the entire driveway may need to be replaced. If the driveway is heaving or shifting significantly, it is usually best to replace it rather than trying to fix it.

The first step in repairing a rough surface is to hose it down and spray it with weed killer. Next, you will need to fill any cracks up to 1/4 inch wide with concrete or cold patch asphalt. It is best to do this in the fall or spring, so that the repair can cure before the temperature gets too hot.

Some of the most common signs that it is time to resurface your driveway include large potholes and alligator cracks (thin, alligator-like cracks that appear on the surface). In addition, you should check your asphalt or concrete driveway regularly for any sunken areas. These can be a sign that the ground underneath is eroding or settling.

Rough surfaces are a complex problem with many different causes. This book provides an overview of the theory, measurement and characterisation of rough surfaces. It covers topics from the fundamentals to advanced applications, and includes chapters on fractals, motif analysis and 3D modelling. It is an ideal reference for scientists and engineers involved in the characterization of surfaces, including manufacturing and production, optical and quality control engineers, and tribologists.

How to Add Beauty to Your Concrete With Stamped Concrete Installation

Concrete Contractors Colorado Springs is sturdy and functional but can also feel industrial. Fortunately, thanks to new technical and creative innovations, homeowners can add beauty to their concrete without sacrificing its durability.

One way to achieve this is by stamping concrete. This process involves pressing a textured mat onto the concrete to make it look like another material, such as brick, stone, or wood.

concrete

The cost of stamped concrete can vary depending on the size and scope of the project. Generally, it is less expensive than other materials, such as pavers, bricks, and natural stone. The main cost is the labor involved in pouring and stamping the concrete. Stamped concrete is also more durable than other materials and requires minimal maintenance. It can be used for patios, driveways, pool decks, and more. It can even be used to create custom concrete furniture.

If you decide to install the concrete yourself, you will need much time and patience. Hiring a professional to ensure the job is done correctly is also a good idea. A contractor can provide you with a quote for the entire project and advise you on any necessary repairs before the installation.

When the concrete is ready to be poured, it must be tamped down to compact it. Once it has been tamped, it must be set for several hours before it can be stamped. A contractor will usually lay out a stamped pattern for the concrete before beginning the process. This will help them manage their time and avoid running out of steam. It is also important to note that the window of opportunity for stamping is very short, so the contractor must plan carefully and have enough labor available.

The contractor will begin the process by spraying the patterned concrete with a release agent. This will prevent the concrete from sticking to the stamps and enhance the look of the finished product. The contractor will then apply the stamps to the concrete and press them firmly into the surface. They usually work on one area at a time to avoid overworking the concrete. The stamped concrete must last several days before being walked on or driven on. It is also important to install contraction joints at planned points in the concrete to protect it from stress and cracking.

The price of stamped concrete can vary significantly from contractor to contractor. For example, some contractors may charge more for higher-end designs. These designs can include hand-staining and scoring the concrete. In addition, some contractors may recommend adding additional services to the project, such as a vapor barrier or mesh reinforcement. These options can increase the project’s cost by up to $0.25 per square foot.

Solid stamped concrete stays stable and durable, unlike concrete pavers, which can crack and shift with time and weather conditions. This means you will not have to spend time and money re-leveling your patio or driveway. It also requires less maintenance, and you will not have to deal with the weeds that can grow between the apparent pavers.

If you want to maintain your stamped concrete surface, you should clean it regularly with a broom or garden hose. During cleaning, you should remove any dirt or leaves stuck to the surface. For more difficult stains, you can use an alkaline degreaser. However, before using any cleaner on your stamped concrete, please read the label and spot-test it on a small surface area. If it causes discoloration, choose a different cleaner.

After cleaning your stamped concrete, you should apply a fresh coat of sealant to preserve and protect it. This will help keep it looking new and beautiful for years. A good quality sealant should last two to three years before it needs to be reapplied, but this will depend on the use of the surface and the climate.

Hiring an experienced professional to install your stamped concrete project is important. This is because the installation process is more complicated than regular concrete. Rubber-stamped mats are placed on the concrete before it cures, and they must be positioned precisely to get the desired pattern. An experienced contractor will know how to do this quickly and efficiently.

The maintenance required for stamped concrete is similar to that of other surfaces, such as pavers and tiles. It is best to sweep regularly and rinse with a garden hose or pressure washer on a low setting. A little bit of soap can also be used if necessary. However, avoiding acidic cleaners on stamped concrete would be best, as they can damage the surface.

If you want to enhance the beauty of your stamped concrete, consider adding plants and shrubs around it. This will add color and contrast, and it will also hide any unsightly areas. In addition, you can opt for lighting to create a nice ambiance at night.

Stamped concrete is an increasingly popular alternative to traditional materials like asphalt and pavers. It is less expensive and easier to maintain, and it can be customized with various patterns, textures, and colors to create a unique look that complements your home’s aesthetic. However, it’s important to consider the durability of stamped concrete before deciding. To ensure that your new stamped concrete surface lasts as long as possible, it’s important to use high-quality concrete and follow proper installation and maintenance techniques.

A successful stamped concrete project begins with a strong foundation. Mix the concrete properly and use a leveler to smooth the surface before pouring. It would be best to allow the concrete to cure for a few days before starting the stamping process. During this time, it’s important to remove any debris on the surface of the concrete and test the concrete for strength.

Once the concrete is ready, applying a release agent is important before beginning the stamping process. This will reduce the risk of the stamps sticking to the uncured concrete once it dries. It’s also important to carefully lay out the stamps to match your desired design and ensure they are all aligned properly. The window of time in which the concrete can be stamped is often short, so it’s essential to work quickly and efficiently.

After the concrete is stamped, it’s important to finish the project by applying a sealer. This will protect the concrete from staining and fading, and it will also help to prevent cracking. When choosing a sealer, choose one designed specifically for decorative surfaces. A good quality sealer will last for a long time and will enhance the appearance of your stamped concrete surface. Inspecting the concrete regularly for signs of wear and tear is also important. If any repairs are needed, they can be easily fixed before they become a bigger problem. Routine maintenance and inspections will keep your stamped concrete looking great for years.

Concrete installation involves pouring and shaping the concrete slab, adding any color or additives used, and then using stamps to create a decorative finish. The design and size of the stamps determine the overall pattern of the finished surface, which can mimic the look of cobblestone, brick, wooden planks, or other materials. This process is popular for patios, driveways, pool decks, and other outdoor living spaces like kitchens and porches. The versatility of stamped concrete allows homeowners to create a unique, high-end aesthetic for their outdoor space.

Once the concrete has been poured, it should be allowed to set for a few days. The concrete must dry slowly, which can lead to future cracking. The contractor will mist the concrete regularly to keep it wet. This will help prevent the concrete from drying too quickly and give it a more attractive finish.

After the concrete has had a few days to set, it is ready for stamping. The contractor will apply a release agent to the concrete before stamping mats. The release agent helps prevent the concrete from sticking to the stamping mats. It can be purchased in various colors and forms, including a powder that must be washed off before use or a liquid that does not require washing. It is important to always check the alignment and pattern of the stamps with the concrete to avoid any visual hiccups.

Working from the center of the concrete outward is important to get a crisp, clean appearance. This will prevent inconsistencies on either end of the area. Also, working in the same sequence in which the concrete was poured is important. Inevitably, there will be areas where the full-sized stamps cannot fit (around pillars, up close to the house, or along the edges of the concrete). For these areas, manufacturers make special flexible stamps that can be used in tight spaces.

Once the stamped concrete has dried, it should be sealed to protect it from water damage and dirt. It is recommended to apply two thin coats of sealer to the concrete. The sealer will protect the concrete from stains and moisture, and it will also prolong its life. The sealer should be reapplied every two or three years.